what you need for a tapeless camcorder setup
Share
How to Set Up a Tapeless Camcorder System
Do you love the retro charm of 2000s camcorders but want the convenience of digital recording? With a tapeless camcorder setup, you can record directly onto an SD card, bypassing the limitations of tapes. In this guide, we'll show you how to upgrade your camcorder, including recommended products and step-by-step setup instructions.
Disclaimer
This site contains affiliate links for which I may be compensated.
Essential Products for Your Tapeless Setup
All necessary products are available here: https://linktr.ee/mebblo
Why Go Tapeless?
Record on SD card – No need for MiniDV tapes, saving time and money.
No recording limit – Avoid the 60-90 minute limitation of tapes.
Extra monitoring screen – The ImmersionRC PowerPlay provides a built-in display.
Backup recording – Record on both an SD card and a MiniDV tape for safety.
Easy digital archiving – No need for complicated tape digitization.
Cost-effective – One-time investment in accessories (~€150-200) vs. ongoing tape costs (~€20-30 per tape).
Recommended Gear
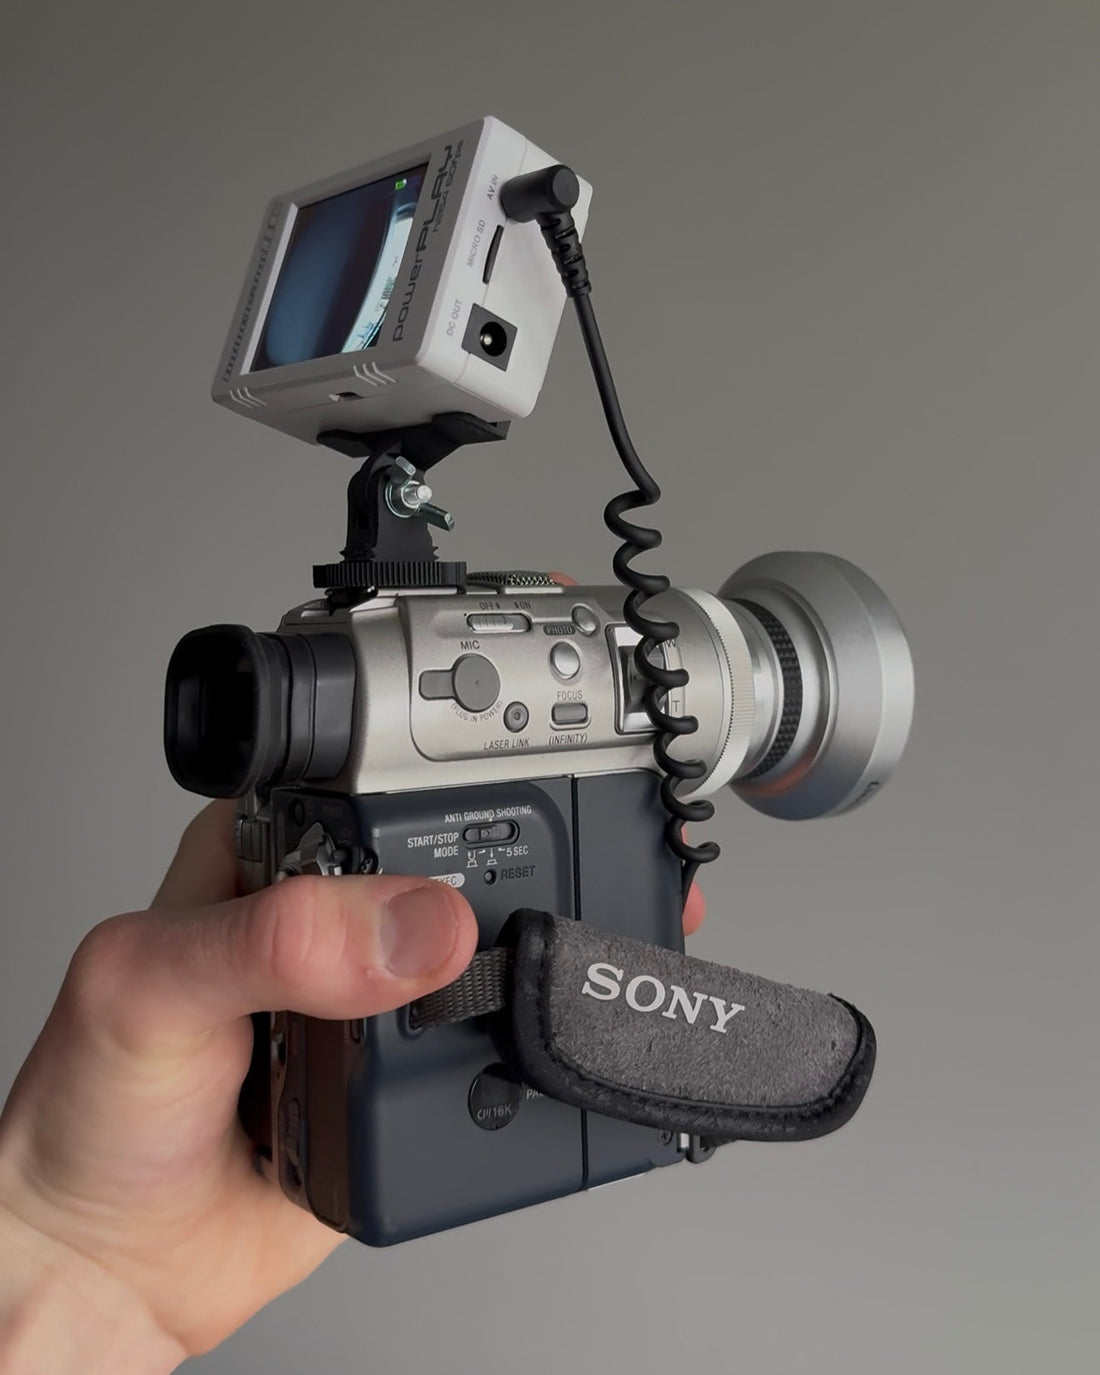
- Camcorder – Sony DCR-PC100E or PC110E (Reliable MiniDV cameras with replaceable batteries).
- ImmersionRC PowerPlay DVR – A compact external recorder for digital capture. eBay (ENG) | Orqa FPV Shop
-
A/V Output Cable – Connects your camcorder to the PowerPlay. Most camcorders have a 3.5mm TRS or TRRS A/V output, so you need the correct cable:
- If your camcorder has a 3.5mm A/V output, use a TRRS to TRS adapter or direct TRRS to RCA cable. eBay (ENG) | eBay (DE)
- If your camcorder has a Sony 10-pin A/V output, use this specific cable: Sony 10-Pin Camcorder A/V Cable
- Mount for ImmersionRC PowerPlay – A secure 3D-printed cold shoe mount. eBay
- MicroSD Card – Class 10 or higher for reliable recording.
- 18500 Batteries & Charger – Power supply for the PowerPlay.
- Fisheye Lens (37mm) – Adds a wide-angle effect to your camcorder. eBay (ENG) | eBay (DE)
- USB Video Grabber (Audio/Video-Grabber) – For digitizing video to your computer. eBay (ENG) | eBay (DE)
Step-by-Step Guide to Setting Up Your Tapeless Camcorder
- Mount the Recorder: Attach the ImmersionRC PowerPlay to your camcorder using a hot shoe mount.
- Connect the A/V Cable: Plug the correct A/V output from the camcorder into the PowerPlay’s input.
- Configure Settings: Disable on-screen display overlays on your camcorder for a clean video feed.
- Insert an SD Card & Power On: Ensure the PowerPlay is charged and ready to record.
- Start Recording: Press record on the PowerPlay (and optionally on the camcorder for backup recording).
- Transfer & Archive: After recording, transfer the SD card files to your computer for easy editing and storage.
Conclusion
Switching to a tapeless camcorder system enhances your filming experience with digital convenience while maintaining the nostalgic feel of using a vintage camcorder. Whether for personal projects or professional use, this setup saves time, reduces costs, and makes archiving simple. Check out https://linktr.ee/mebblo for all the essential gear!